During the long 5 months working on my Honeydukes I took many photos along the way. Here are a few showing the kit as it is build. Please see my previous post for the completed project.
 |
| Spiral staircase made of a fan, spindles, dowel and balsa wood |
  |
| Stonework |
 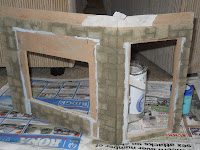 |
| After grouting |
The coarsed stone bricks and grout were purchased from Richard Stacey. They were really easy to break into halve pieces when needed.
Tiles were created using sticky back plastic. Rub on letter transfers were used on the coving.
 |
| Polymer clay sweets and cakes ready to be baked (including jelly slugs, chocolates and fudge) |
 |
| Fudge, nougat, coconut ice, Jelly slugs on eye shadow trays |
 |
| Chocolates |
 |
| Cakes, chocolate strawberries |
 |
| Egg box stones |
Small pieces of balsa wood were used to create beams on the ceiling. Using egg boxes I cut bricks and stuck them to a block wood to create a chimney stack for the side of the building. A mix of grey, silver and brown acrylics were used painting the bricks to make them look like stone and moss was added.
I cut MDF with a jigsaw to build the roof extension and glued in place using wood glue. A hole was also cut for 'access' to the top bedroom.
 |
| Roof extension |
 |
| Wall filler finish on walls |
Chimney stacks with egg box stonework.
 |
| Paperclay drying |
 |
| Upper room being wired |
 |
| Adding concealed wiring |
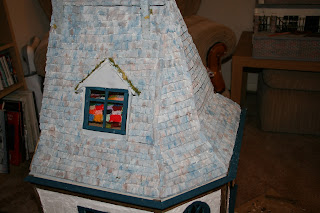 |
| Painted roof tiles awaiting snow fall (using scenic snow) |
Acrylics were used to paint the paperclay tiles. Grey, blue and brown were used. I then covered the roof in glue where, I wanted snow to sit and poured over scenic snow. This was very messy and needed several coats, layer by layer.


Hi, Amazing HoneyDukes store! I am about to try and create a HoneyDukes shop diorama for my son and I love how you've done the foot plates on the stairs. Could I ask how you've done them or what you used? Thanks and incredible job!
ReplyDelete