Sunday 23 August 2015

Workshop


Another long period of time without a post.. but I should be back to more regular posts as I now have a dedicated workshop for working on my houses! I have spent this year working on the workshop rather than the miniatures and now it is finally complete!

My log cabin workshop
Lined the inside with breathable liner and Celotex insulation

Covered with plywood and then painted, then put down lino on the floor
I ended up theming the workshop as "Gryffindor Common Room" as I thought of it as a crazy idea and then I couldn't imagine it any other way.


Custom build workbench, recovered chair from charity shop, custom notice board


Lighting
"Chocolate Frog"
Some of the houses in place

 It's great to finally have a place to store all my craft materials and the houses together as well as have the space to work on them. It will take me a while to fully unpack everything as some minis are still in boxes from when I moved house last year!


Thursday 15 January 2015

A new year and a new post

It has been almost a year since my last post! That does not mean I have not done any miniature work! I had been meaning to post some pictures of the 12 Grimmauld Place kitchen floor which I completed last summer, but I got distracted by moving house, changing job and going on holiday. I also visited Miniatur Wunderland in Hamburg, which was amazing! A post to come on that soon! A lot of things were in boxes for a while and all the dollshouses don't have a home yet. Though they hopefully will by the summer! I am looking to fit a log cabin to act as my craft room. Then I will have plenty of space and a spare room for guests too.

So the kitchen floor was made with DAS airdry paperclay. It works really well and is less bitty that creative paperclay, and cheaper/easier to get hold of in the UK.

Using a sculpting tool I marked out a pattern after glueing down the rolled out sections of clay with PVA glue. The floor was then painted with a water wash of different acrylics once dry. I have also added some coving and dado rail which are just thin strips of balsa wood varnished to match the woodwork.


Work has begun on Sirius Black's bedroom as of this week as I have been re-reading Order Of the Phoenix, which has inspired me to work on this again. I have used some fabric from the lining of an old coat to imitate the 'silk' wallpaper described in the books. I will not use real silk as I am a vegetarian and this fabric was free. I pasted it on just like wallpaper and I am pleased with the results.


I had some curtains I bought at a fair which match the walls too. Will need some velcro to hold them in place when the roof is open though as they look a bit wonky!


Hope to share some more work soon!

Monday 24 February 2014

Woodland Nursery Complete


I have finished the nursery 5 days before the baby shower! So time to relax. Here are pictures of the last bits of work and the finished box.

Arial view of finished nursery (before lid and plastic added)


Baby changing products made from polymer clay and printed labels

Open drawers


Front view. Items on the shelf include toys that are bought and made from polymer clay and beads. Blankets and clothes are folded on the shelves (small pieces of scrap fabric). I made several books from scrap card and printed covers.


Cot mobile made from wire, ribbon and a metal finding. The animals are made from polymer clay and hung on the mobile.


Lampshade made from card, fabric and wire

Box papered and ready to be gifted


I kind of wish I could keep it.


Saturday 15 February 2014

Woodland nursery accessories

I have been quite busy at work but I have somehow managed to make some progress on the nursery. I have added skirting and coving to the box as well as making a lid from cardboard.

I created this nappy stacker, inspired by this blog following the translated steps as best as I could. post: http://lascosasdemeapunto.blogspot.co.uk/2011/05/quereis-hacer-una-panalera-de-tela.html 


I added some nappies inside made from scraps of canvas folded.
 The baby bouncer was made from this blog tutorial: http://members.home.nl/wilhelmiens/wipstoeltje.htm
It didn't translate that well and I didn't follow it exactly, but I am happy with the result still.


I have added a shelf with flowers in a bead vase, a basket made of polymer clay and a hedgehog ornament


Still lots to do to finish the box and only 2 weeks to go until the baby shower. 

Left to do is: 
  • Finish creating a mobile for the cot
  • Make polymer clay accessories
  • Make books 
  • Make clothing to display
  • Make ceiling light/shade
  • Add ceiling paper
  • Glue in place
  • Wrap the outside
  • Cover front with perspex

Wednesday 5 February 2014

London Dollshouse Festival, Nursery Curtains and cot bedding


I visited the London Dollshouse Festival on Sunday with my mum. There were lots of lovely expensive items I could not afford, (Buying a house and going to a Harry Potter convention in Orlando in the same year is expensive). I decided to focus on purchasing items I needed.

Ok, this isn't something that was needed. But it is very cute and has a purple case like on my Nexus 7.

My haul. The dresser is for Grimmauld place and The Utility Chest of Drawers for the Fairbanks Nursery.

Pie, Plates and Bowls for Grimmauld Place. Mini beach huts are for the Fairbanks bathroom.
I only bought a baby bottle and a cuddly rabbit for the woodland nursery. I now have less than a month until the baby shower and not a lot of time to complete it, but I have made some progress.

Changing mat made from foam and fabric glued together

I was really impressed how good the cot bedding came out after improvising it. I used cream felt and pieces of fabric.

1. Firstly I measured the parimeter of the inside of the cot and the hight I wanted the bumper to be. Then I cut the felt to that size in a strip.
2. I covered the mattress in green dotty fabric.
3. I cut two pieces of the mushroom fabric which were the length of the cot with extra length for tabs on all sides. I then glued down the width tabs to the back of the fabric then folded over the length tabs on the felt and glued where the sides of the cot will be.


4. I then cut two pieces of the coordinating green dotty fabric to the length of the ends of the cot with tabs. I folded over the widths and glued as before, then folded the top tabs over the felt and glued into place.

5. I cut another two piece of felt the same size as the whole piece and glued to the back.


6. I fitted it into the cot. The corners fold where the pieces of fabric meet. A blanket made of felt was added with the corner glued in place.

7.  To create bumper ties I threaded some trimming onto a needle and stitched through the backing felt where the end cot bars would be.


8.  I created one at each end, cutting the trimming, ready to tie.


9. Tied into place


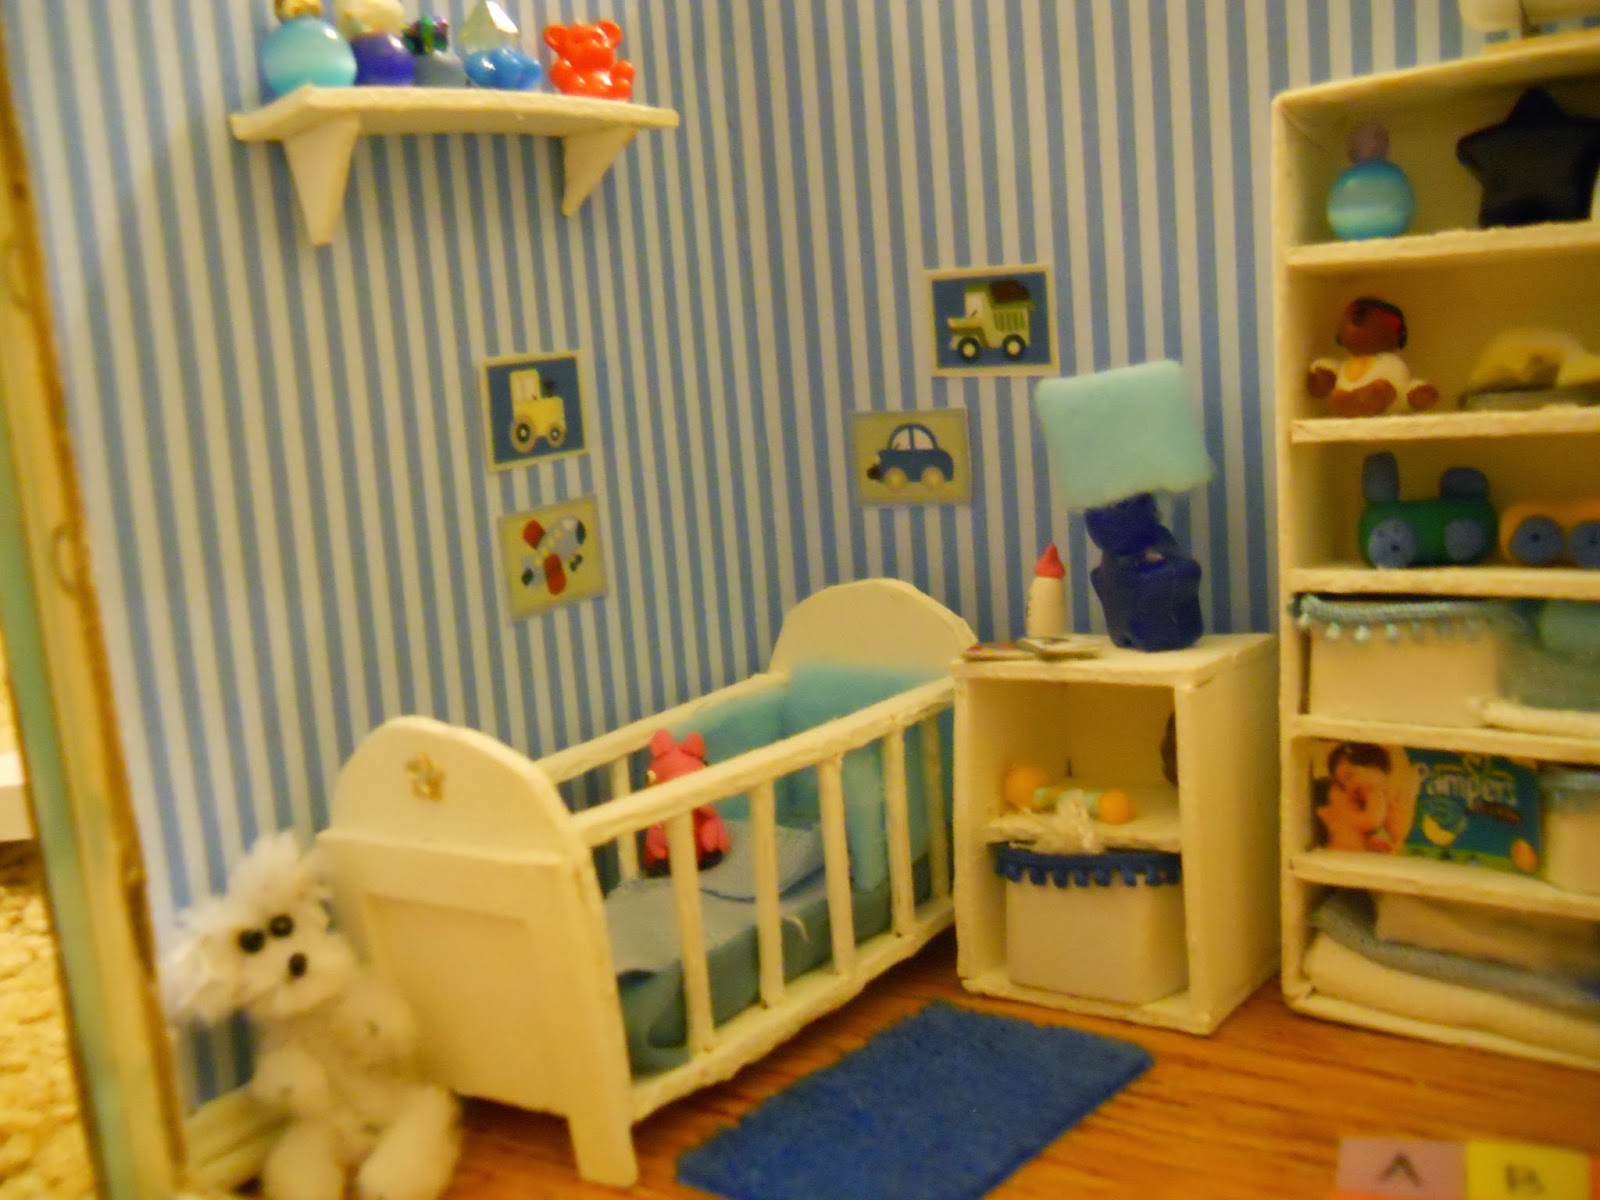
I have added some wall decorations from various jewellery findings that fit with the woodland theme.


This evening I made the curtains. I don't own a pleater or have any spray starch so I improvised.

1.  I cut two pieces of fabric that were a bit wider than the width of the window and the length I desired. I glued over the edges to prevent fraying (the back will not be seen from a dummy window).

2. I folded the curtains into pleats and ironed them.
3. I gave them a good spray with hair spray on both sides.  

4. I made the pelmet using scrap card and just glued on fabric and trimming.

The window is made from a printed image, clear plastic from packaging and painted coffee stirrers.
5. I glued the curtains and place and added trimming as a curtain tie on each.

Finished curtains!

Looks like a nice view

The box so far!

I think next I will need to make the lid. Then it is on to the detail. I need accessories for the shelf, I might create a mobile and I want to create a baby bouncer.

Sunday 19 January 2014

Woodland nursery

A new project for a new year. A family baby is on the way, so this is a gift for the mother. I hope to continue with my other projects once this one is complete. I plan to present it at a planned baby shower at the beginning of March so I haven't got very long.

It's a girl, but I decided rather than design the usual 'pink' nursery, I wanted to do something different; A woodland themed nursery.


 This time I am going for 1:12th scale. I bought plain wood furniture ready to varnish myself (except for the cot as I could not find one within budget that fitted the style I wanted) 


I attempted to sand the cot by hand and using my new Dremel to get the hard to reach spots with one of the engraving tools. It was very difficult and I probably should have bought the more expensive plain wood cot as when varnishing, I didn't get a great finish. Once in place, the cot doesn't look too bad and has the 'aged' look, (Well that is what I am telling myself).

With papered walls and carpet


Making a miniature beanbag from a circle of fabric. I have used small beads to make the 'beans'. Then I sewed around the edge with running stitch, pulled in and added a ribbon 'handle'.

Finished mushroom beanbag

The next step will be to create a window with curtains and work on the cot bedding.

Saturday 30 November 2013

1:24th scale nursery box


I have been busy with miniatures but not so much on my own projects! The only thing I have done is added ceiling paper to the Grimmauld Place kitchen, but I do not have a picture of it at the moment.

A colleague of mine had a baby so I quickly put together a 1:24th scale nursery as a gift. I had a bit of help from another colleague and fellow modeller John. John specialises in model tanks and very expertly painted the boat, aeroplane as well as building a MIG welder out of plasticard, (The father of the baby enjoys working on cars, so we thought he would find it funny that the nursery comes complete with a welder!)


MIG Welder 1:24th scale
Welder, plane and boat
The welder even has a plug socket!

The majority of the contents are made from thick white card. The box itself was an ornament box with a hole cut in the front and plastic added to protect the contents. The outside has been papered to hide the design on the card.


I have never worked in 1:24th scale before and I found modelling in Polymer clay to be quite tricky to get detail. The Peppa Pig and Rastamouse being the trickiest things to make so small. Everything I did was made from scraps so I spent no money at all!


The plane hangs from the ceiling with wire. Was very tricky to close the box because of this!
Peppa Pig in the cot, Beads and odds and ends made jars/bottles


Shelf full of baby items, books and changing table
Arial shot
Cot made from card, balsa wood and cocktail sticks. Dressed with felt and fabric


3 scales in one picture, 1:12, 1:24 and 1:144
I really enjoyed working in a smaller scale as it was a challenge. The gift was well received and is to be displayed on a shelf in baby's room. There might be another opportunity next year to make another nursery for a family member but for a girl. I might do this one in 1:12th scale. Also I may be experimenting in railway model buildings as my boyfriend is building a train layout. So lots of interesting things to come!