Saturday, 30 November 2013

1:24th scale nursery box


I have been busy with miniatures but not so much on my own projects! The only thing I have done is added ceiling paper to the Grimmauld Place kitchen, but I do not have a picture of it at the moment.

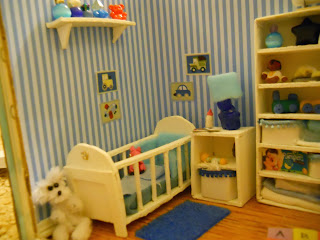
A colleague of mine had a baby so I quickly put together a 1:24th scale nursery as a gift. I had a bit of help from another colleague and fellow modeller John. John specialises in model tanks and very expertly painted the boat, aeroplane as well as building a MIG welder out of plasticard, (The father of the baby enjoys working on cars, so we thought he would find it funny that the nursery comes complete with a welder!)


MIG Welder 1:24th scale
Welder, plane and boat
The welder even has a plug socket!

The majority of the contents are made from thick white card. The box itself was an ornament box with a hole cut in the front and plastic added to protect the contents. The outside has been papered to hide the design on the card.


I have never worked in 1:24th scale before and I found modelling in Polymer clay to be quite tricky to get detail. The Peppa Pig and Rastamouse being the trickiest things to make so small. Everything I did was made from scraps so I spent no money at all!


The plane hangs from the ceiling with wire. Was very tricky to close the box because of this!
Peppa Pig in the cot, Beads and odds and ends made jars/bottles


Shelf full of baby items, books and changing table
Arial shot
Cot made from card, balsa wood and cocktail sticks. Dressed with felt and fabric


3 scales in one picture, 1:12, 1:24 and 1:144
I really enjoyed working in a smaller scale as it was a challenge. The gift was well received and is to be displayed on a shelf in baby's room. There might be another opportunity next year to make another nursery for a family member but for a girl. I might do this one in 1:12th scale. Also I may be experimenting in railway model buildings as my boyfriend is building a train layout. So lots of interesting things to come!

Wednesday, 16 October 2013

Busy not doing miniatures

I have been quite busy the last few months. I went to a Harry Potter convention (LeakyCon London!). I have also been busy at work and volunteering in a Harry Potter Alliance chapter, so not much time for minis. 

Since my last post I have finished the 'tile' backdrop for the range surround. I will need to paint the ceiling before I fix it in place but here is how it will look.

Kreacher looks grumpy
I also used up some old air drying clay left over from Honeydukes to do the floor in Kreacher's 'den'. It was a bit dry so I added some water and it helped, but I will probably throw the last bit of clay away. This will need painting, but I will wait until I finish the whole kitchen floor. I need to buy more clay and lots of it!


I attended a dollshouse fair in Rayleigh by chance and bought a few nice items. 


For Grimmauld Place kitchen
Ferret - A pet for the Fairbanks house
I have completed the outside of the 1/144th scale house. I got a few pieces of soft metal furniture at the fair for it too. I hope to make some furniture too when I get some time.


There are a few new accessories in this kitchen too!


Tuesday, 27 August 2013

Back to miniatures and the real world

There has been a lack of posts lately as I have been busy working on a personal Android app and preparing to go away to LeakyCon London, a Harry Potter convention. Now that is over I have more time to dedicate to miniatures. As I am in a Harry Potter mood, I have continued work on 12 Grimmauld Place.

I really want to begin work on the floor in the kitchen, but before I can do that I need to sort the range. I bought a cheap range from a Sue Ryder charity shop and decided to paint it black using enamel paint.


I want a chimney breast around the range and originally attempted to cut one out of wood but had difficulty using thin wood to cut such delicate pieces with a scroll saw. I tried again with some stiff card which looks pretty good once painted. For the back of the breast, I am creating tiles using sticky back plastic. I have 'cracked' a few by cutting jagged lines through the 'tile' for the aged and dilapidated look.


I have been continuing with the Fairbanks house brick work too and I hope to create some furniture for my 1/144th scale kit soon. 

I plan on 'dirtying' up the grout of the tiles by using coffee/tea once I have finished the tiles. I also hope to add a shelf for pots and pans. Once glued in place, I will be able to start the floor using Das air dry clay to make a flag stoned floor.

Tuesday, 21 May 2013

Nursery Toys

Sorry for the lack of posts! I have been on holiday to Venice and thought I would share my latest purchase for the Fairbanks Nursery. A Murano Glass elephant! It is beautiful and very detailed.  Other nursery toys I have acquired are also shown.

Murano Glass elephant (centre), 1/144th dollshouse kit, zebra and Kinder Egg toy bike

Carpet and flooring has been added

Hopefully I will have some time to do some work on both Fairbanks and Grimmauld place soon!

Tuesday, 16 April 2013

The two small kitchens post


Firstly I have now started on my Grimmauld Place kitchen. It took a couple of hours to strip out the old tiled floorpaper and the tiled/blue wall paper using a wet cloth.  Once that was completed I began painting the walls. It took me a while to decide on the colour(s), but eventually I settled on top half white, bottom half green. I have seen some examples both real size and miniature of Victorian/ early 1900s kitchens (As I feel this is the appropriate style from the book descriptions) using these colours and I felt the green would fit with the rest of the house. I then used tea and coffee to stain the walls.

 I plan on building an enclosed cupboard under the stairs that houses the boiler (and where Kreacher lives). Also I am going to enclose the cooking range at the end of the room, in line with the chimney. The room at the end will be the pantry with some scullery usage. I know this isn't how it would have been done, but I am short of space and any issues with water getting into food storage is solved with the fact that washing chores are controlled by magic ;-). 

 I have a more up to date entrance hall picture. Not complete yet as the top half of the stairs need spindles and rail, a door is required to the dinning room, there are missing house elf heads and other details. I plan to sand and re-stain the grandfather clock and add curtains to the painting of Mrs. Black.


Kreacher Lerking on the stairs

The drawing room has also been papered, but paneling, flooring and ceiling are still to come. 


I also have been working on my Fairbanks dollshouse. I have done a few small jobs on the kitchen and have a few more accessories. There are still a few minor things to do.


Front of house
Newly painted doors


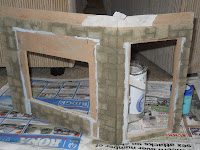
 I have also been working on the outside doing brick work using brick slips.It takes a lot of time to individually stick each brick to such a large house! I am not going to put them on the whole house, but on areas I feel they look best such as the front and the chimney.


I will continue working on both projects and hopefully have an update soon.

Friday, 12 April 2013

Returning to an abandoned project

In 2010 I was given a dollshouse by a family friend which I decided to turn into 12 Grimmauld Place from the Harry Potter series as it was a big Georgian style house which was a bit battered. The house needed completely re-painting and decorating. I completely redecorated the outside of the house to look like a London town house in need of repair. I started work on the entrance hall and drawing room and bought many items of furniture at dollshouse fairs. In 2011 I moved house and I haven't touched the house since then. I have decided to work on the kitchen next week, so I am going to outline the house so far.


The house as I received it
Inside
All of the blue and cream was either covered with luxury brick paper or painted white. I am now thinking that I should have used brick slips, but at the time I had limited budget. I probably won't change it as these bricks don't look too bad. Roof tile slips were purchased from Richard Stacey. They are much cheaper than the real slate but they look quite good and are easy to work with. They have a lighter grey on the opposite side too. I dirtied the paintwork on the house and added moss for an overgrown effect. A gritted effect spray paint on card was used to make the stone for the pavement and basement area. 


'Stone' painted bricks were made for the basement using balsa wood painted with white emulsion. The doors were painted with a black gloss and I added the door number 12 and a knocker.


 Inside the house, I worked on the entrance hall and the drawing room. I will have more up to date pictures of these in the next post as more work has been completed. I cut the staircase 
in half and built a raised platform. I used coffee stirrers to make floor boards and stained them. I then built a boxed in area to house the 'stairs' to the basement. I have attempted to age the wallpaper by creating rips and peeling effects.


The door knobs are described in the books as being serpent shaped. I purchased some small wooden door knobs designed for furniture. I then used polymer clay to create snakes heads to extend the size of the knobs. Detail such as mouth and eyes were added with a cocktail stick. After baking I painted with silver enamel paint, then glued nail art sticks to look like emeralds in the eyes, as this seemed like the kind of extravagance that the Black's would have in their house.


Furniture for the drawing room as made from a mixture of kits and pieces of furniture that came with the house. A couch was reupholstered to match the other seating.


Completed seating for drawing room

Sunday, 17 February 2013

Honeydukes sweetshop progress photos

During the long 5 months working on my Honeydukes I took many photos along the way. Here are a few showing the kit as it is build. Please see my previous post for the completed project.


Spiral staircase made of a fan, spindles, dowel and balsa wood
Stonework
After grouting 
The coarsed stone bricks and grout were purchased from Richard Stacey. They were really easy to break into halve pieces when needed.


Tiles were created using sticky back plastic. Rub on letter transfers were used on the coving.


Polymer clay sweets and cakes ready to be baked (including jelly slugs, chocolates and fudge)
Fudge, nougat, coconut ice, Jelly slugs on eye shadow trays

Chocolates


Cakes, chocolate strawberries


Egg box stones
Small pieces of balsa wood were used to create beams on the ceiling. Using egg boxes I cut bricks and stuck them to a block wood to create a chimney stack for the side of the building.  A mix of grey, silver and brown acrylics were used painting the bricks to make them look like stone and moss was added.


I cut MDF with a jigsaw to build the roof extension and glued in place using wood glue. A hole was also cut for 'access' to the top bedroom.


Roof extension


Wall filler finish on walls


Chimney stacks with egg box stonework.
Paperclay drying


Upper room being wired


Adding concealed wiring


Painted roof tiles awaiting snow fall (using scenic snow)
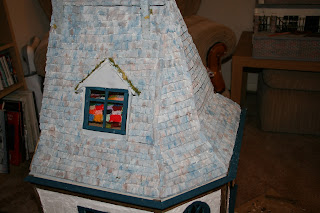
Acrylics were used to paint the paperclay tiles. Grey, blue and brown were used. I then covered the roof  in glue where, I wanted snow to sit and poured over scenic snow. This was very messy and needed several coats, layer by layer.